USER MANUAL · REDESIGNED APP
Metronomics
manual
Start with a steady pulse, then build the practice session you need.
This manual covers the Metronomics app on Android, iPhone, iPad, and Mac. Screenshots show the Apple app; layouts and control names may vary by platform.
Using an older interface? Open the previous-version Apple manual or the previous-version Android manual.
Start here
Metronomics combines a steady pulse with independent rhythm layers. Use it as a simple metronome, add subdivisions to hear complex rhythms, or leave gaps in the sound to practice keeping time yourself.
- Open Metronome.
- Use the − / + buttons beside Tempo to set your speed.
- Tap the time signature and choose a meter, such as 4/4.
- For a steady click, use a quarter-note subdivision with probability and volume turned up. Turn down or mute other layers.
- Tap Start. The same button becomes Stop.
The Basic app has Metronome, Saved, and Settings tabs. On Apple platforms, Pro adds Grid, Wheel, and Inspector; each can be hidden in Settings. Layouts adapt to larger screens, so a control may sit in a different position.
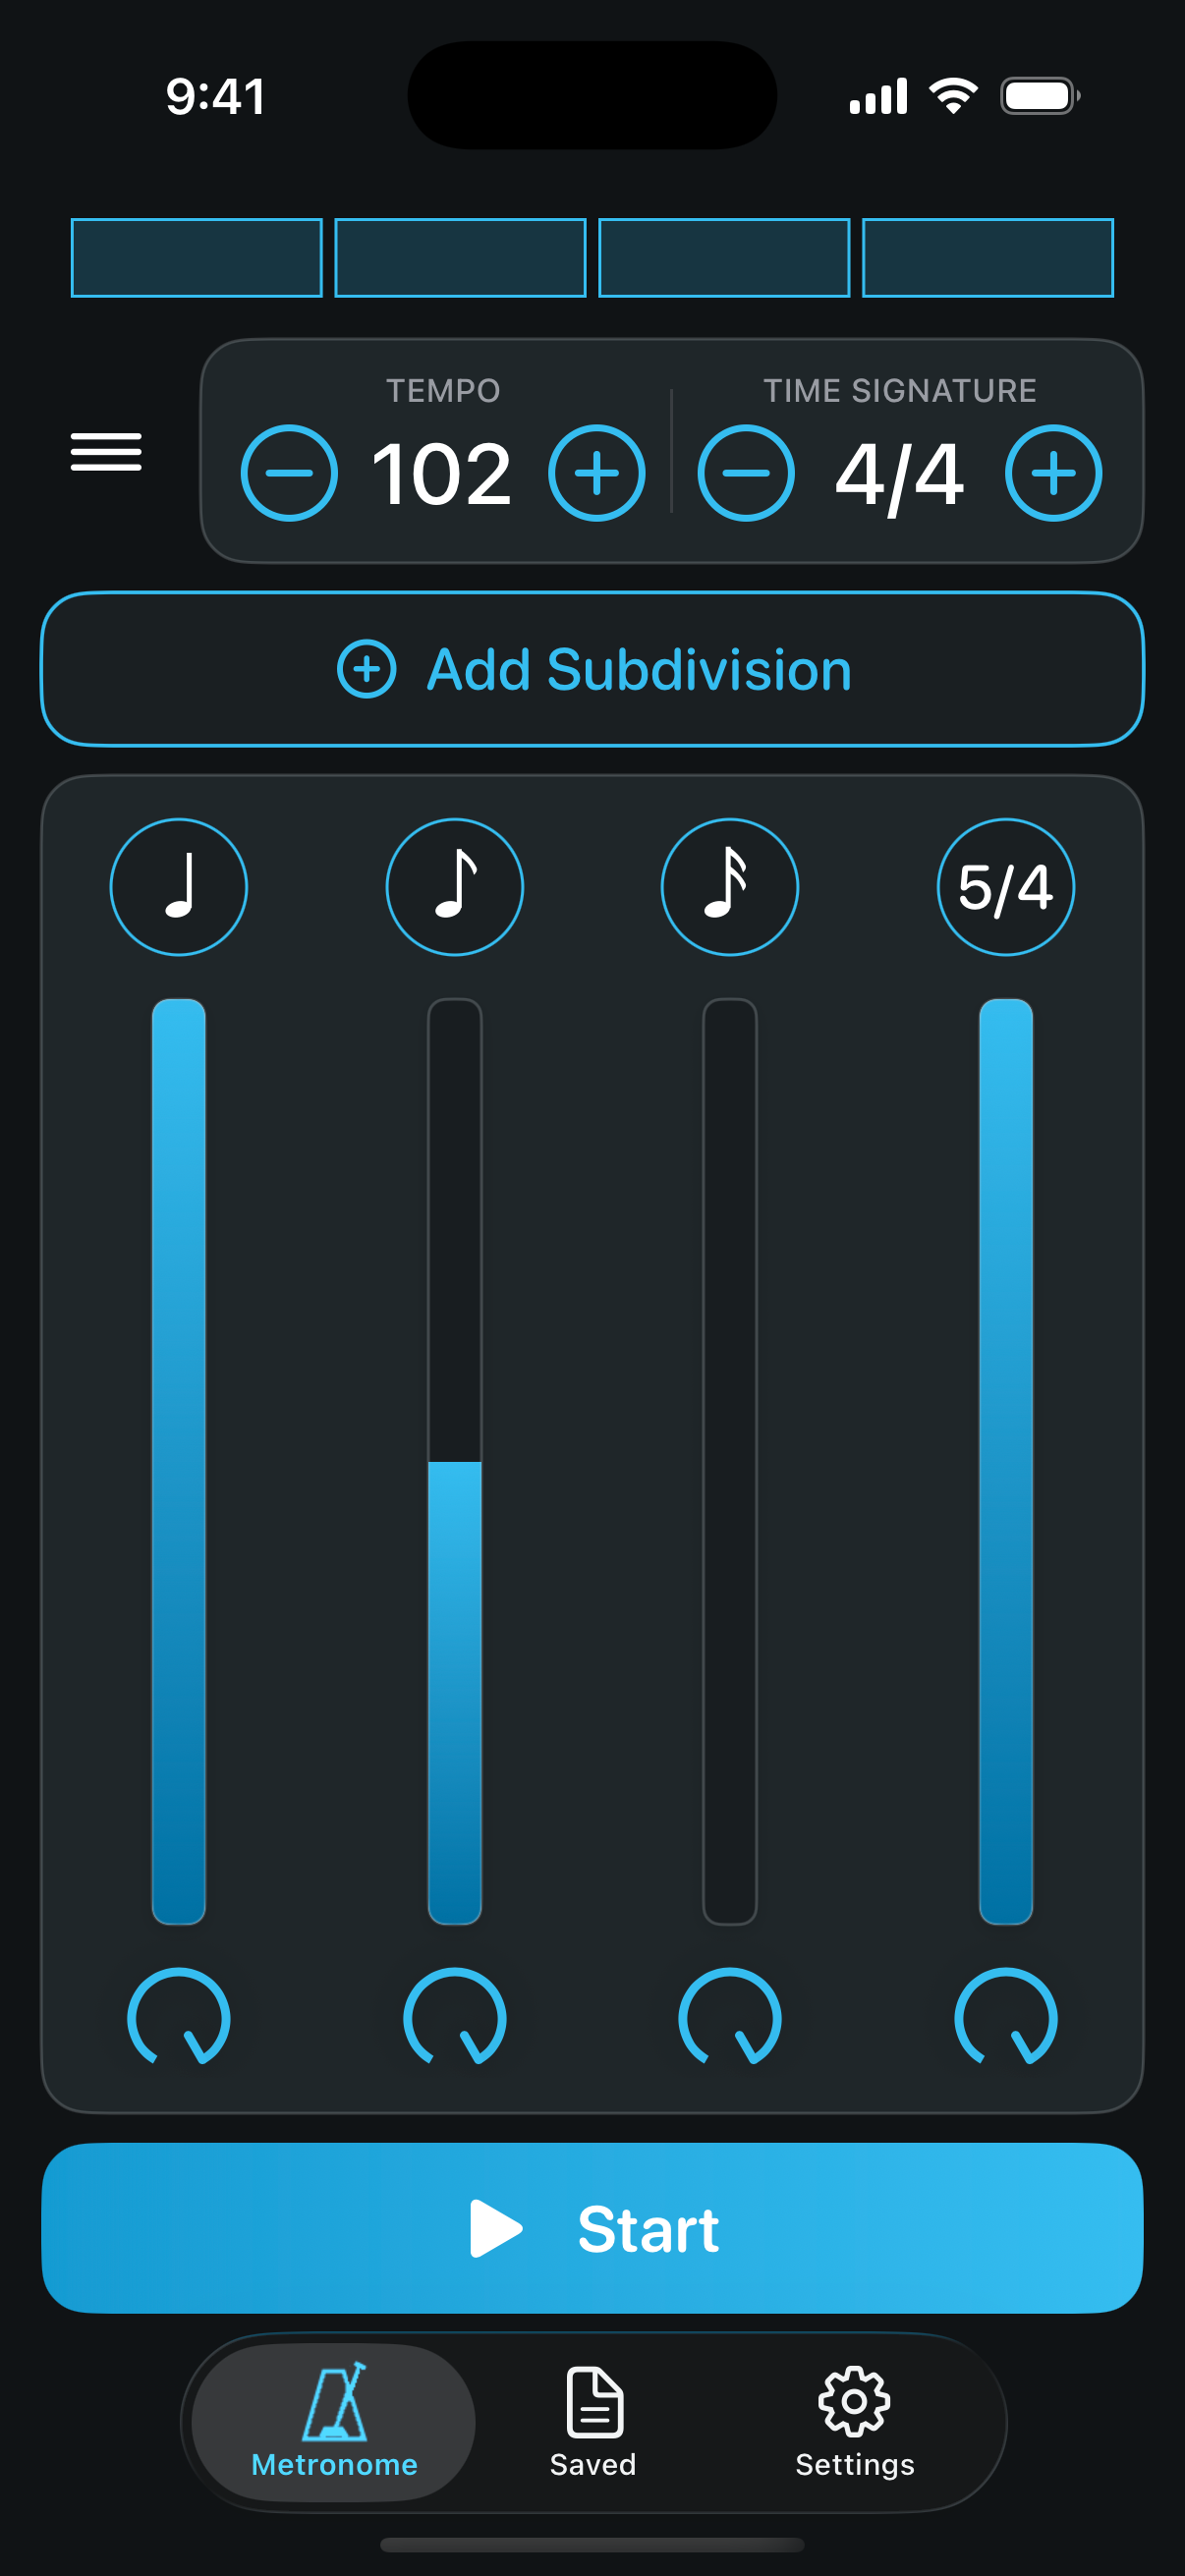
Tempo and time signature
Set or tap a tempo
Watch the tutorial: Set the tempo (YouTube).
Tempo is measured in beats per minute (BPM), with a range of 1–500. Use the − / + buttons for small changes. Hold a button for faster adjustment; Settings → Round tempo to 10s on hold controls rounding.
On iPhone and iPad, tap the tempo number repeatedly in time to set a tap tempo. Touch and hold the number to enter a tempo directly. On Mac, clicking the number opens a tempo popover with entry and tap controls.
Choose a meter
Watch the tutorial: Change the time signature (YouTube).
Tap the time signature to open its editor. Common offers standard meters. In Custom, use Add segment to build a meter such as 4/4 + 3/8. Remove unwanted segments and tap the checkmark to apply the meter when finished. The − / + controls on the main screen adjust the numerator of a single-segment meter; use the editor for multi-segment meters.
Basic includes denominators 2, 4, 8, and 16, including combinations of segments. Pro adds other denominators.
A quarter note and “Every beat” are different
Ordinary subdivisions keep their note duration when the meter denominator changes. Every beat follows each beat of the displayed meter. In 4/4 + 4/8, Every beat sounds four times in each segment; a quarter-note layer sounds four times in the first segment and twice in the second. Use Settings → Auto-add 'Every beat' to add this special layer automatically when switching to a meter with a denominator other than 4.
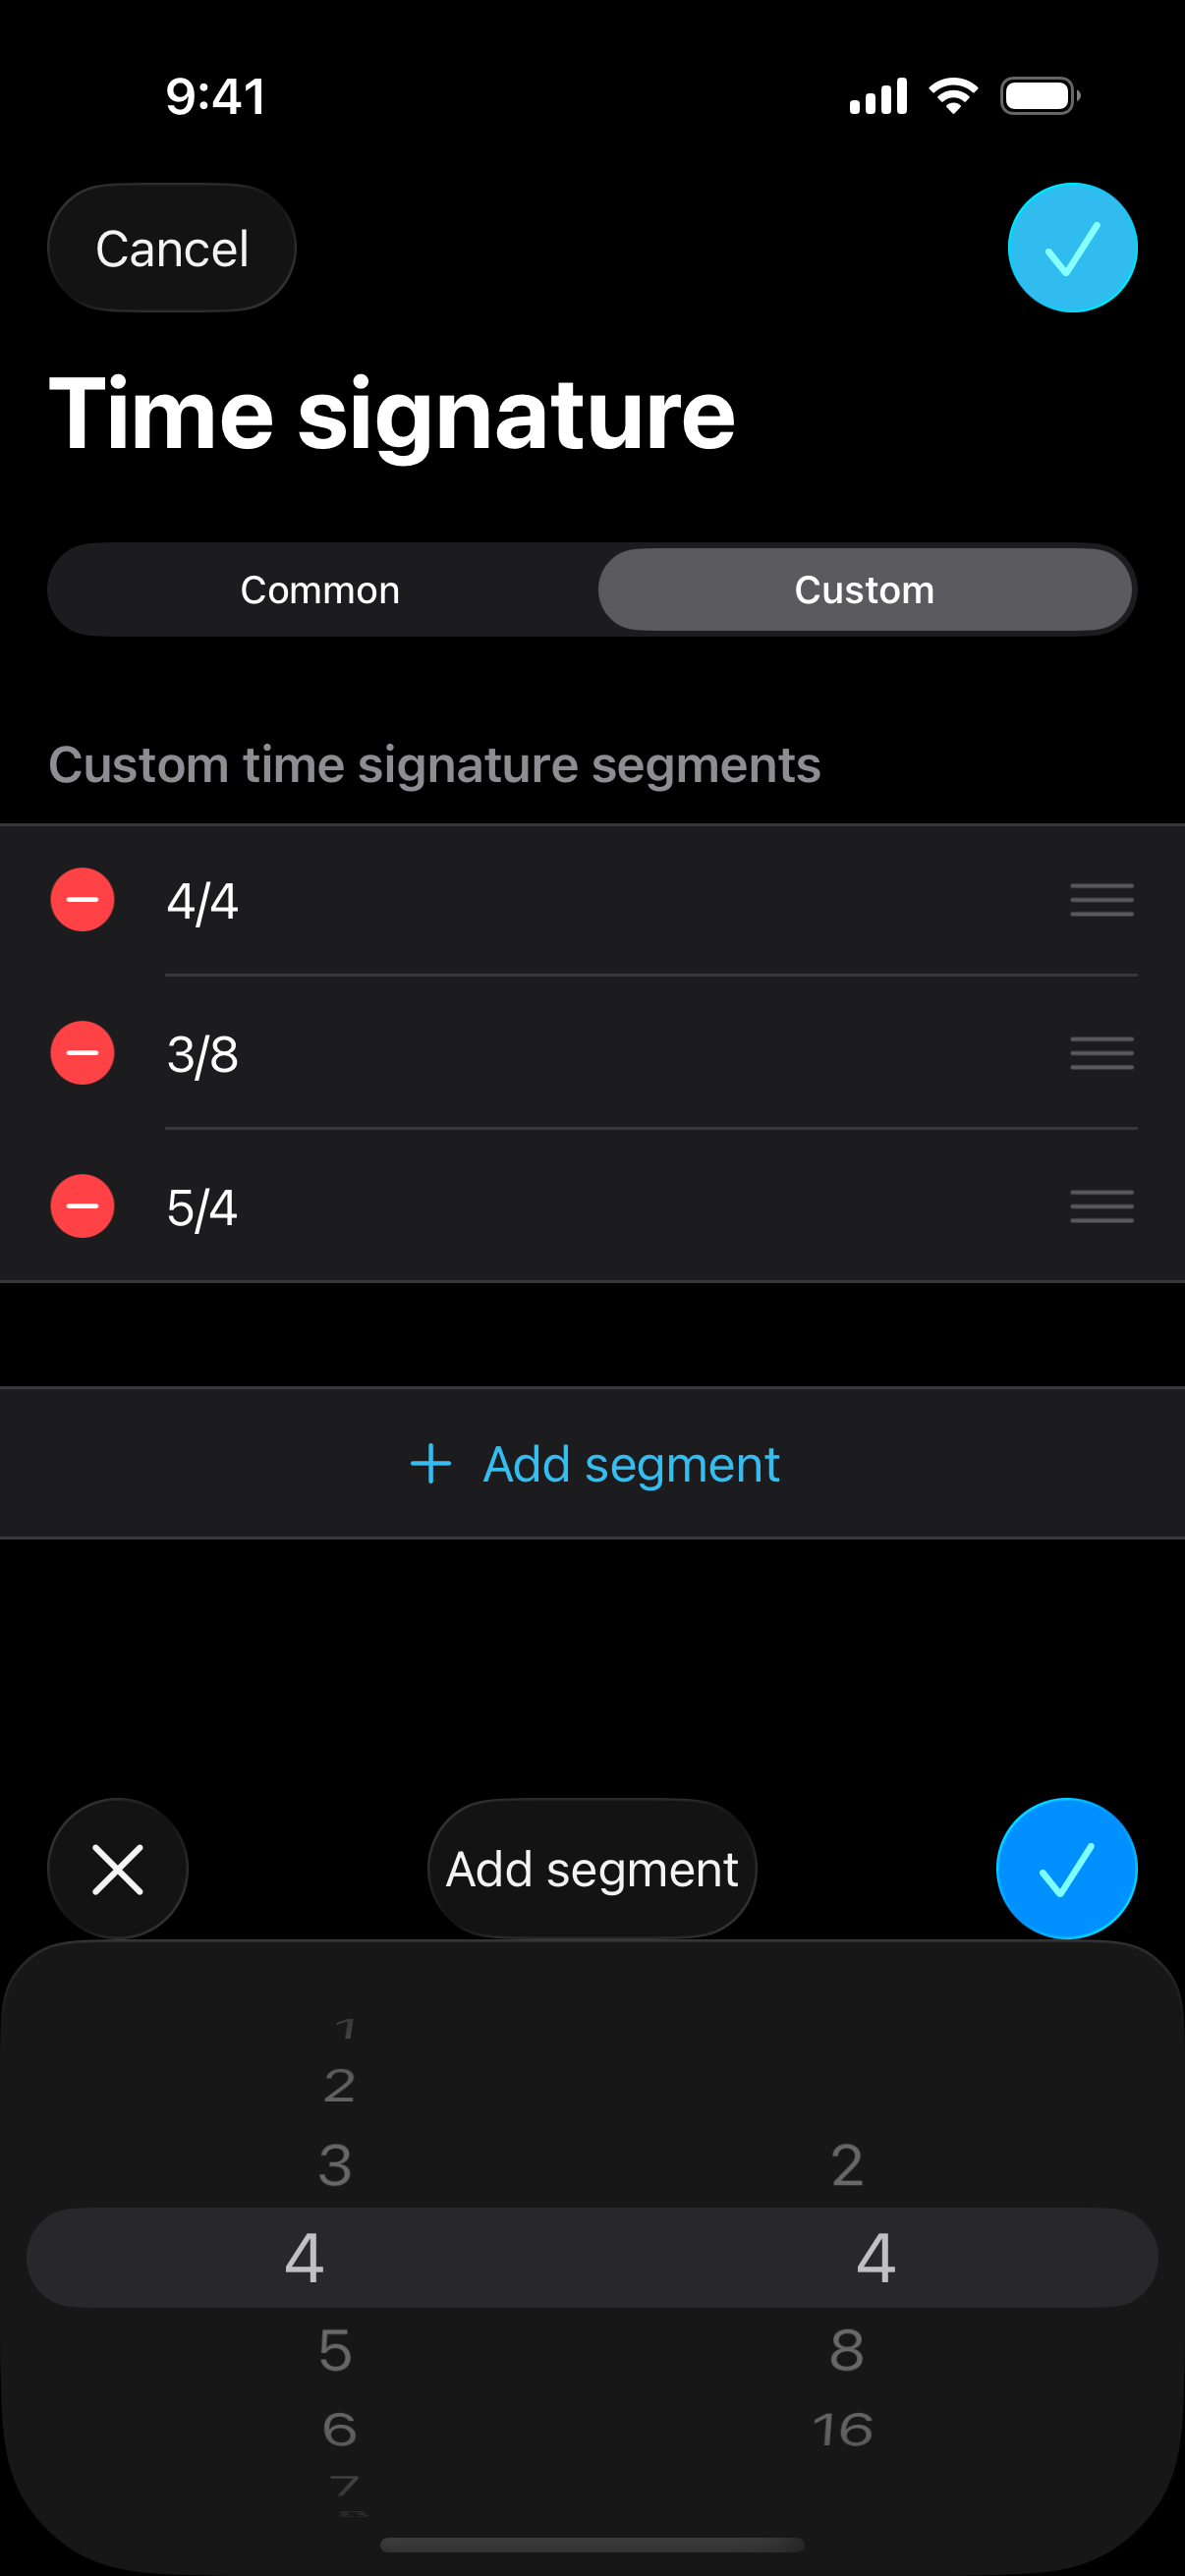
Subdivisions and the mixer
A subdivision is a rhythm layer with its own sound, probability, volume, and optional sequence. Several layers can run together.
Add a layer
Watch the tutorial: Add subdivisions (YouTube).
- Tap Add Subdivision.
- Choose a Sound and, optionally, a Display color.
- Select a common subdivision, a preset, a custom ratio, or Every beat.
- Tap Add.
Custom ratios describe how many notes fit into a number of quarter-note beats. 2/1 gives two notes per beat (eighth notes); 3/2 gives three notes over two beats (quarter-note triplets); 5/4 gives five evenly spaced notes over four beats. These custom ratios are available in Basic.
Probability and volume
Watch the tutorial: Subdivision probability, sequencing, and mute (YouTube).
By default, the tall slider controls Probability and the knob below controls Volume. Change Settings → Metronome screen → Sliders to swap their roles.
Probability is the chance that a note sounds at each opportunity: 100% gives every note, 0% gives none, and an intermediate value creates gaps. It does not guarantee an exact number of notes per bar. Volume sets the loudness of the layer. Sequenced layers use their programmed steps, so their probability control is disabled.
Edit, mute, duplicate, or remove
Tap the circular subdivision icon to open Subdivision settings. Touch and hold the icon (or right-click on Mac) for its menu: mute/unmute, enable/disable the sequencer where supported, duplicate, move up/down, or remove. The special downbeat has fewer options.
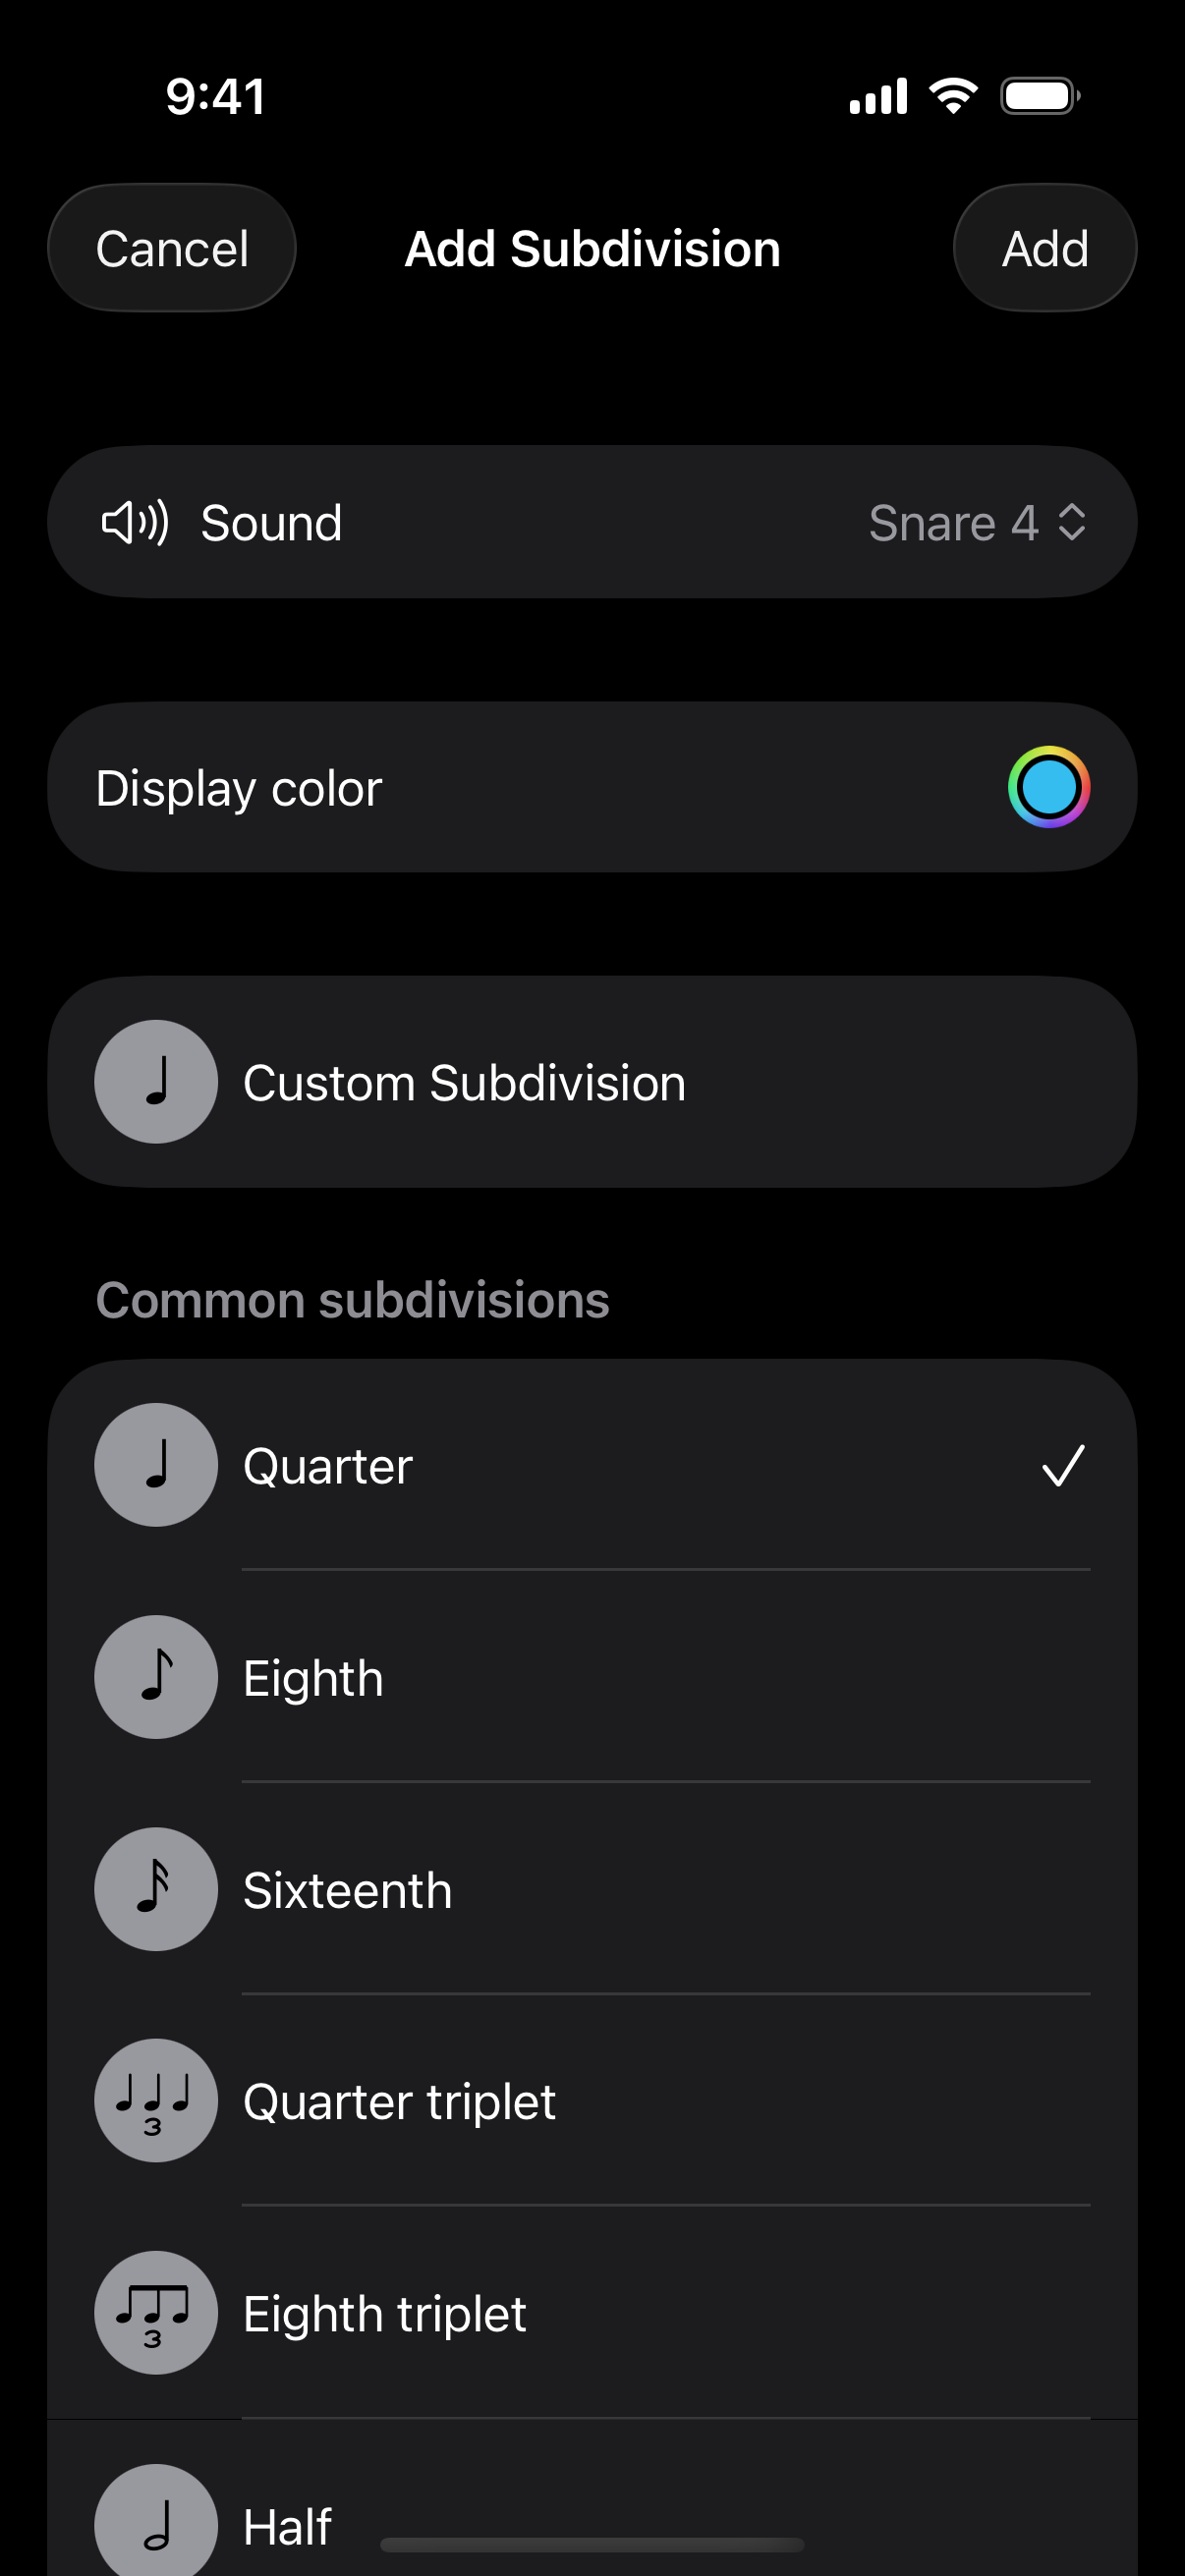
Subdivision settings
Open these settings by tapping a layer’s circular icon. Changes apply to that layer; close the sheet to return to the mixer.
- Mute
- Silences the layer without removing its settings.
- Volume variation
- Enable this to set Min volume, Max volume, and % variation. The variation percentage is the chance that a note’s volume is varied.
- Sound
- Choose a built-in sound. Pro also allows imported sounds and MIDI subdivisions.
- Subdivision duration
- Changes the rhythm’s ratio using the same notes-per-beats scheme as Custom subdivision.
- Offset and Offset type
- Delay where the layer begins. Offset is the number of offset units; Offset type defines their duration using the same ratio scheme. Use zero for no offset.
- Swing
- Enable Swing, then adjust Swing amount. This is available when the subdivision numerator is divisible by two. Match swing amount lets you apply that amount to layers with the same duration or to all subdivisions.
- Display color
- Choose a color for the layer, or use the minus button beside the color picker to return to the default.
- Remove subdivision
- Removes the layer after confirmation. To silence it temporarily, use Mute instead.
Downbeat and Every beat are special layers and do not offer all of these options.
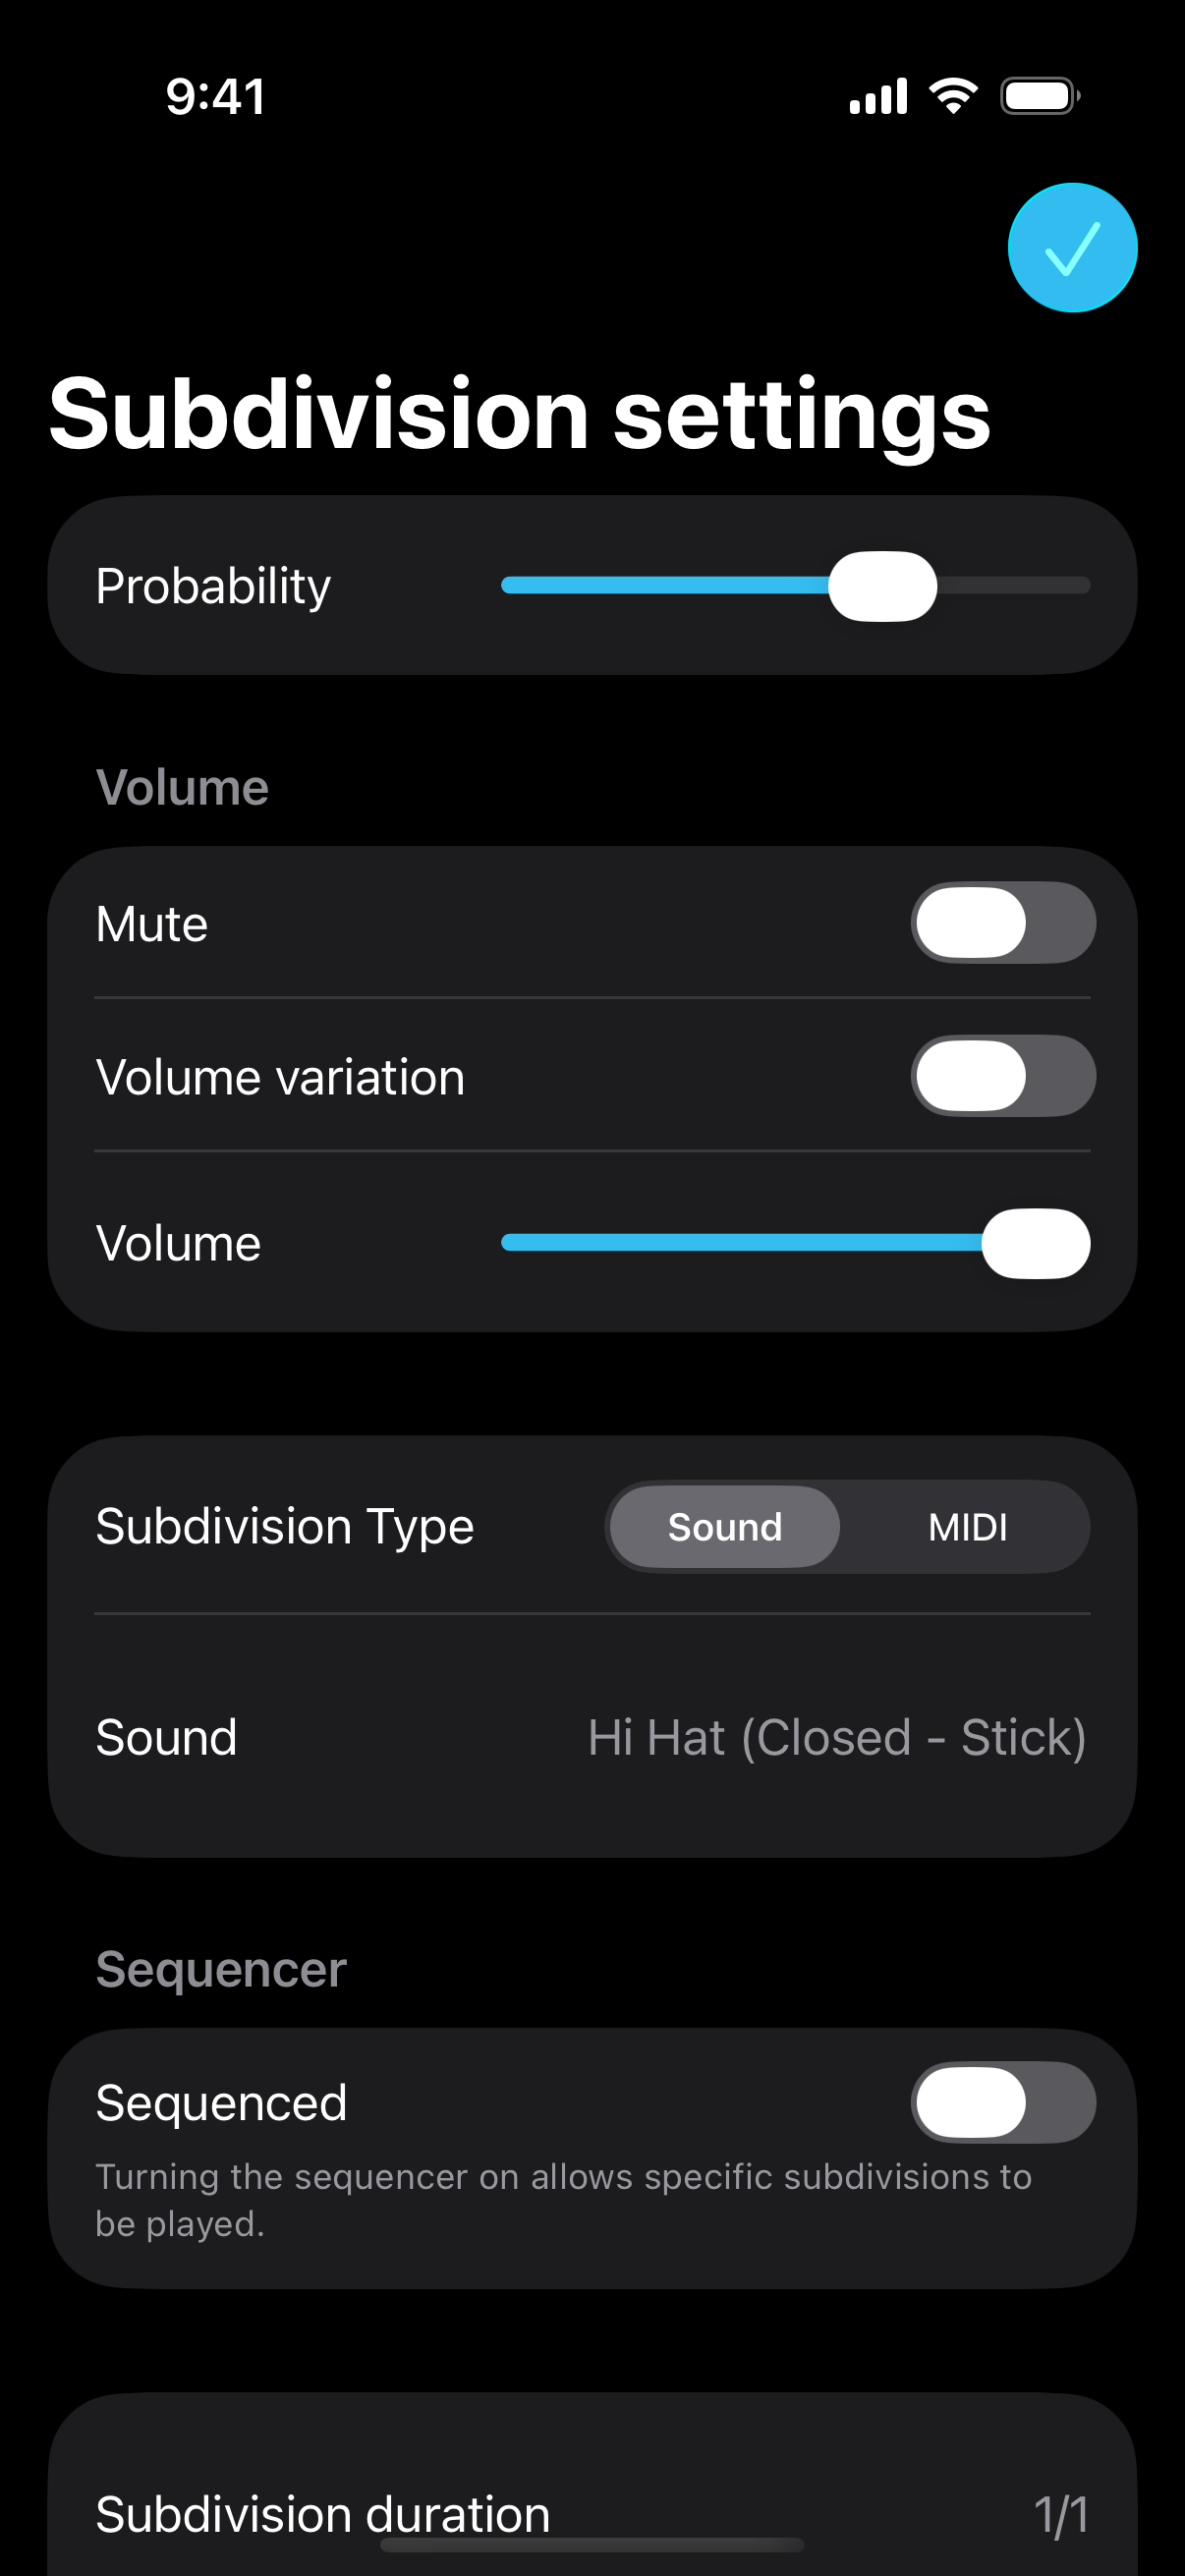
Program a repeating rhythm
Watch the tutorial: Subdivision probability, sequencing, and mute (YouTube).
Use a sequence when you want to choose exactly which notes play. The per-layer sequencer is available in Basic; Pro’s Grid provides another way to edit the layers together.
- Open a subdivision’s settings.
- Turn on Sequenced.
- Set Sequence length, measured in subdivision positions, not bars.
- Tap the sequence cells to turn positions on or off. Scroll sideways to reach longer patterns.
- Start playback to hear the pattern repeat.
For example, eight positions of an eighth-note subdivision fill one bar of 4/4. Turn on alternating positions for quarter-note clicks, or choose a syncopated pattern. A sequence with a different length can repeat across bar lines.
Turn Sequenced off to return to probability-based playback. MIDI layers use their own note sequencer; tapping a MIDI cell opens the note editor.
Practice controls
On the Metronome screen, tap the three-line button beside the tempo panel to show the controls drawer. Scroll it to reach all controls. Tap a value to enter it directly, or use its − / + buttons.
Downbeat
Downbeat Every sets the number of bars between downbeat accents. In Settings, turn on Show downbeat to show its mixer control, and open Downbeat settings to change its sound and volume. Play downbeat during inaudible bars keeps this reference audible while the other layers are silent.
Bar Repeats
Repeats a generated bar’s pattern before generating a new one. The displayed value is the number of times the bar plays; 1 means no extra repeats. This is useful for hearing a randomly generated rhythm several times before moving on.
Audible Bars and Inaudible Bars
Set how many bars sound, followed by how many bars are silent. Try 3 audible / 1 inaudible: keep playing through the missing bar and listen to how you line up when the click returns. Set Inaudible Bars to 0 for continuous sound.
Touch and hold either audibility value to enable or disable Random audible bars. In this mode the values show probabilities rather than fixed bar counts. You can also enter a percentage, such as 75%, in the Audible value to give each bar a 75% chance of sounding.
Tempo Change and Change Every
Tempo Change is the BPM adjustment, and Change Every is the number of bars between adjustments. For example, +2 every 4 bars gradually raises the tempo. A negative change slows it down. Set Tempo Change to 0 (shown as None) to disable it.
Count Off and Timer
Count Off sets the number of lead-in bars; 0 disables it. Timer stops playback after the selected duration. Enter a time as minutes:seconds, such as 5:00 for five minutes. Enter None to disable the timer. Inspector has its own 20-minute session maximum.
Save, organize, and share
Save your current metronome
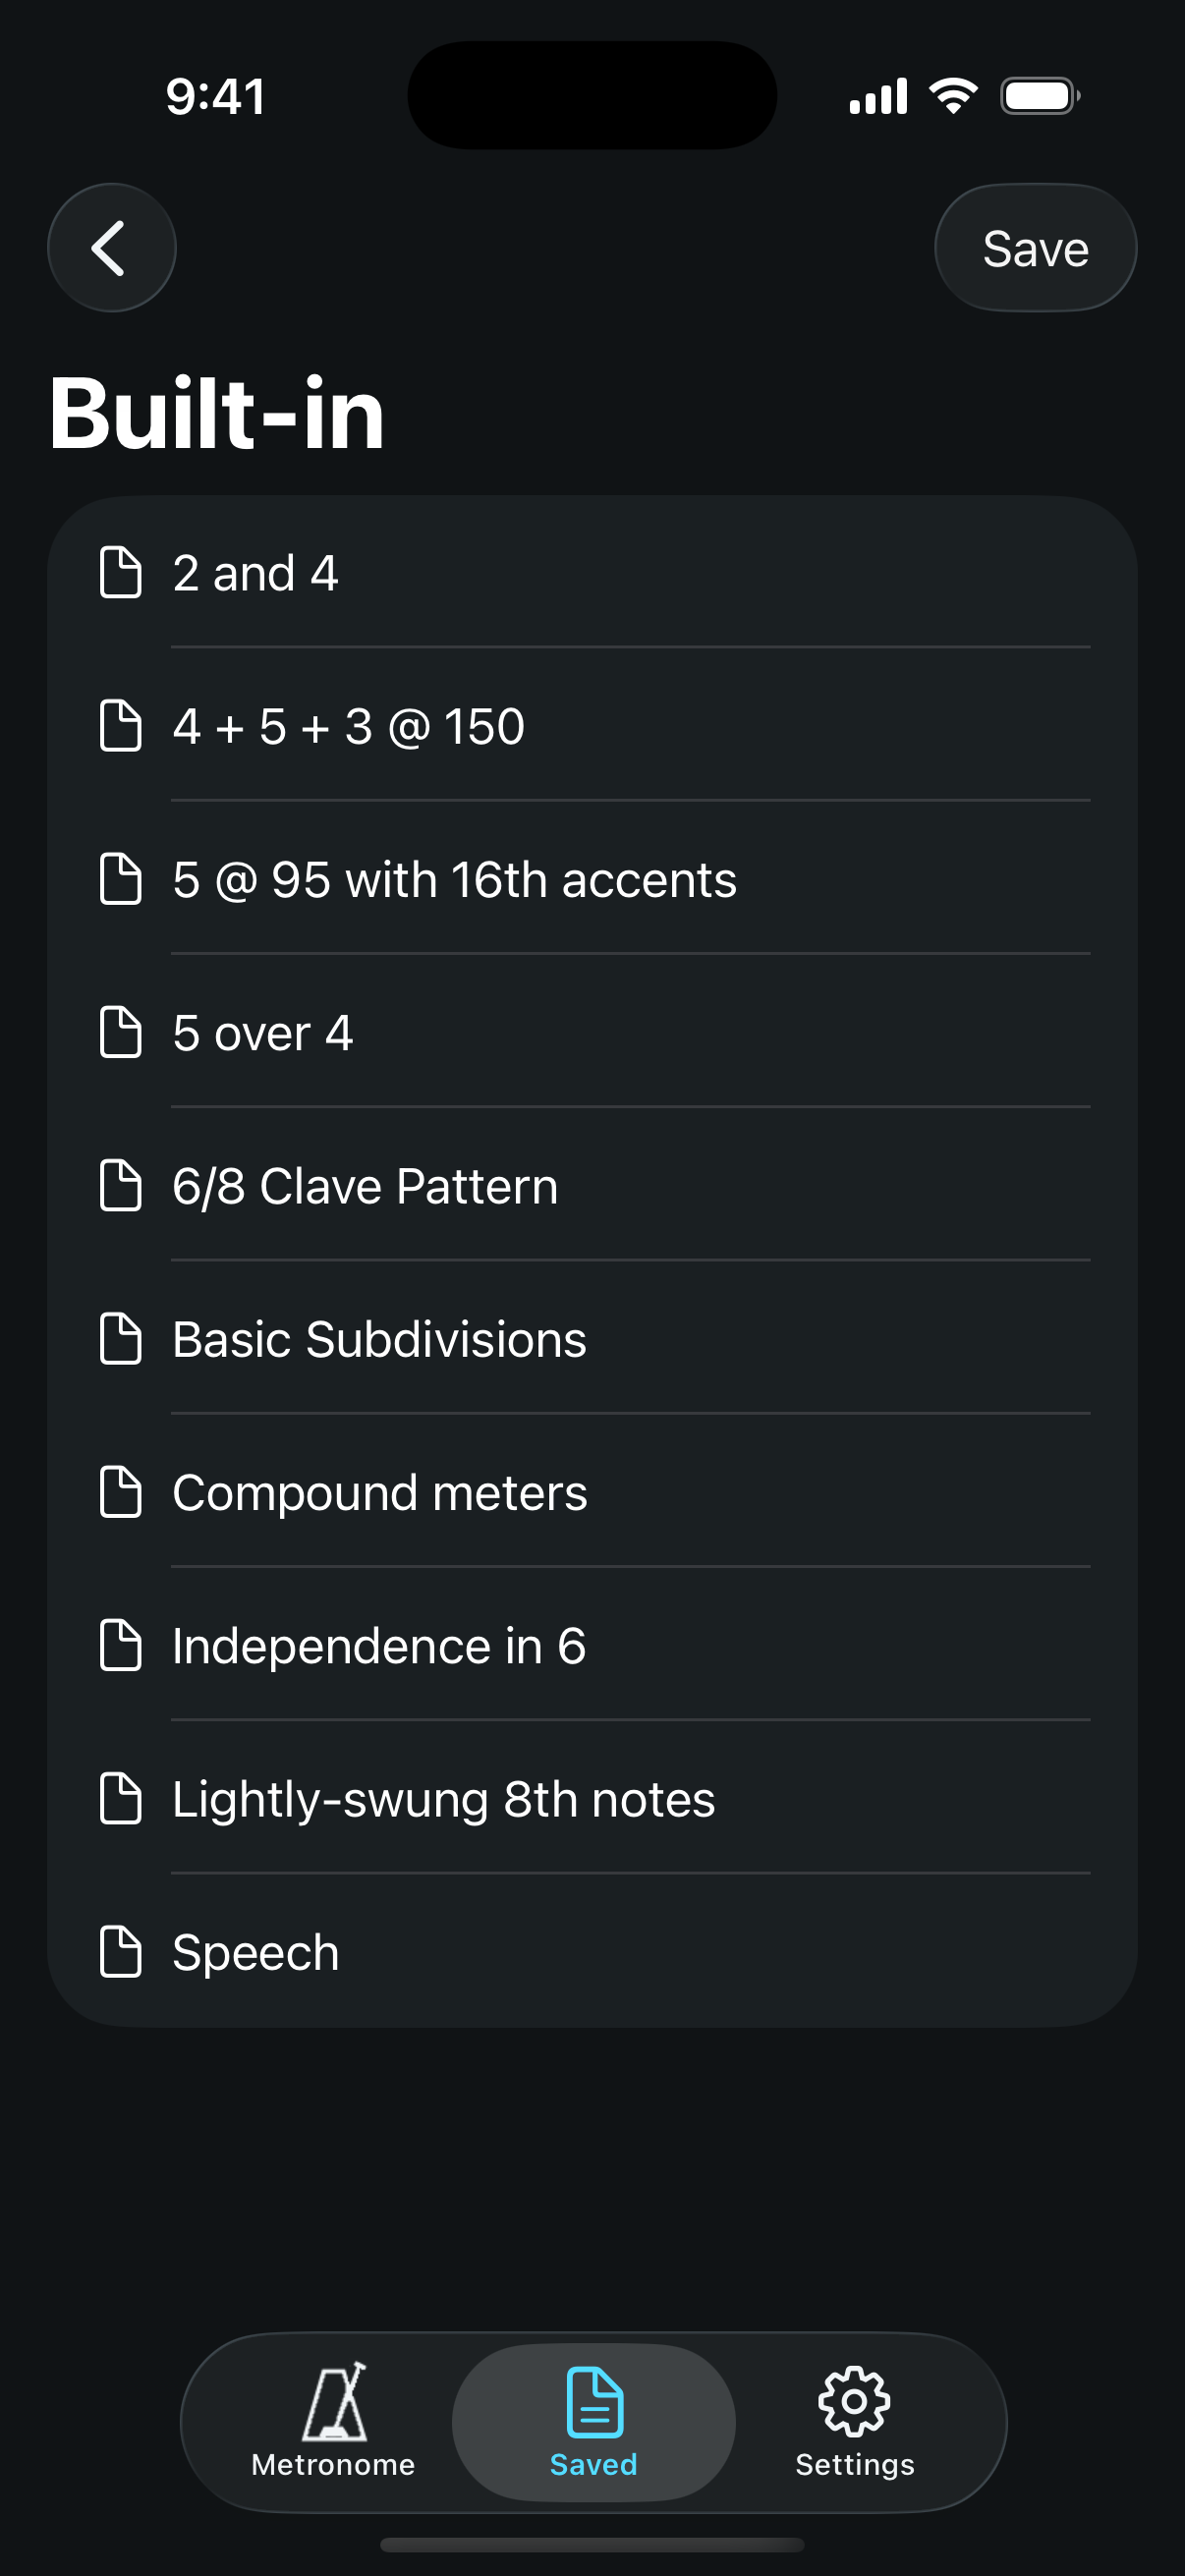
- Open Saved → Metronomes and tap Save.
- Enter a name and choose a folder, or create a New folder.
- Tap Save in the dialog.
Tap a saved metronome to load it. The Default Metronome entry provides a starting setup. Save again when you want to keep changes you make after loading a file.
Organize files
Touch and hold a saved metronome, or right-click on Mac, for Info, Rename, Duplicate, Share, and Delete. Info shows its tempo, time signature, and subdivision count, with buttons to load or share it. Open a folder to see its contents.
Share and import
Choose Share to send an editable metronome file through the system share sheet. For a bundle of your metronomes, use Settings → Export → Export metronomes. This is different from exporting an audio recording.
Open a received metronome file in Metronomics from Files or another app’s share/open options. Imported metronomes appear in the Imported folder. On Mac, the app’s import menu also opens a file chooser.
Playlists
Playlists arrange saved metronomes into an order for a rehearsal, set, or practice routine.
- Save the metronomes you want to use.
- Open Saved → Playlists.
- Tap Add and name the playlist.
- Open it, tap Add, and select a saved metronome to add as a song.
- Use Edit to reorder or remove entries.
Tap a song to load it. Use Start/Stop and the previous/next controls at the top as you work through the list. Select the next song when you are ready to move on. To delete a playlist, use Edit in the playlist list and confirm the deletion.
Grid · Pro · Apple only
Grid puts your subdivision sequences into rows so you can compare and edit them together. It edits the same metronome you use in the mixer.
- Open Grid. If it is hidden, enable Settings → Grid view → Show grid tab.
- Tap cells in a layer’s row to program its rhythm. If its sequencer is off, confirm Turn on sequencer, then choose the steps.
- Use the measure controls to move through the displayed pattern.
- On iPhone and iPad, tap the small sliders button beside a row to show its settings. Use More settings for the full subdivision editor.
Row settings include probability, volume, mute, sequence length, and swing where applicable. Probability is for layers with sequencing off. Tapping a MIDI cell opens the MIDI note editor.
Wheel · Pro · Apple only
Wheel shows the metronome’s subdivisions as points moving around circles, making it easier to see how different rhythms line up. It uses the same layers and playback as the Metronome screen.
Enable it with Settings → Circle view → Show wheel tab. In that section you can show or hide the top beat indicator, subdivision circles, and geometric shapes; highlight the primary node; choose clockwise or counterclockwise motion; and select spokes, ticks, or no beat indicator.
Inspector · Pro · Apple only
Inspector graphs your playing beside the metronome output so you can inspect timing. Choose Settings → Inspector → Input type: Audio for microphone input, or MIDI for MIDI input. Turn on Show inspector tab if necessary.
Calibrate audio input
- Connect the microphone and output you plan to use, and allow microphone access when requested.
- Open Settings → Inspector → Latency calibration.
- Make sure the microphone can hear the metronome’s click. With headphones, you may need to hold an earpiece near the microphone.
- Tap Run calibration and wait for the result.
Calibrate again whenever you change your audio setup. The calibration screen also lets you adjust Latency compensation manually. For MIDI input, choose the MIDI channel and MIDI latency in the Inspector settings.
Record and inspect
Open Inspector, start the metronome, and play. Stop to examine the captured input against the metronome events. Scroll through the display and use the zoom controls for a closer view. Show peak lines marks detected attacks when stopped. If detection misses attacks or finds too many, adjust Peak factor; lower values tend to detect more peaks.
Inspector sessions have a 20-minute maximum and stop automatically at that limit. Audio captures can be exported with Export audio: microphone only, microphone plus metronome in stereo, or microphone and metronome on separate channels. If the recording is marked Incomplete, the export may not contain the full session.
Custom sounds and MIDI · Pro · Apple only
Import a sound
Open or share an audio file into Metronomics. Supported import extensions include WAV, AIFF, CAF, MP3, M4A, and MP4. On Mac, use the sample import command. After importing, select the sound in Add Subdivision or a layer’s Sound picker.
Use a MIDI subdivision
- Open a regular subdivision’s settings and choose Subdivision Type → MIDI.
- Choose Internal to use the built-in MIDI sounds, or External to send MIDI to other software.
- Set the MIDI channel and MIDI program.
- Set the sequence length and tap a sequence cell to edit its notes.
- Use the note editor’s keyboard to choose notes. Adjust Note length and Use velocity as needed.
For External output, configure the receiving app to listen to Metronomics’ MIDI output and the matching channel. External MIDI needs a receiving instrument to produce sound. A MIDI subdivision uses its note sequence instead of the ordinary on/off sound sequence.
Export audio and MIDI · Pro · Apple only
These exports turn the current metronome into a file for playback or use in music software. To send someone an editable Metronomics setup, use Share or Export metronomes instead.
Audio
- Open Settings → Export → Export audio.
- Choose Time or Measures and set the run time.
- Tap Export and use the share sheet to save or send the file.
MIDI
- Open Settings → Export → Export MIDI.
- Set the Run time.
- Choose the channel arrangement, start note, and note interval.
- Tap Export and save or share the file.
A MIDI file contains performance instructions for a receiving instrument; its sound depends on the instrument you use to play it.
Settings, usage, and iCloud
Appearance and playback
In Settings, choose System, Light, or Dark appearance and a color theme. Metronome screen options control the visual beat indicator, subdivision animation, and slider behavior.
On iPhone and iPad, Disable auto-lock keeps the screen awake, Play in background allows continued playback outside the app, and Mix with other audio allows other audio to play alongside it. Lock-screen playback controls are unavailable when mixing is enabled. On Mac, Settings also includes a master volume control.
Audio Effects
Open Audio → Audio Effects in the main app and turn on Effects Enabled. Enable Reverb to choose a space and amount, or Equalizer to adjust low, mid, and high frequencies. Turn Effects Enabled off to bypass the effects.
Usage
Settings → Usage shows total time, time today, and daily practice history. Scroll the graph sideways to see more days. Use the sharing options to share your activity. Reset clears usage statistics after confirmation.
iCloud sync Pro · Apple only
Enable Settings → iCloud → iCloud sync to store metronomes, playlists, and samples in iCloud Drive. iCloud Drive must be configured on the device and Metronomics must have access. Enable sync on the devices you want to use together.
Changing this setting moves the app’s saved files between local storage and iCloud. Let the operation finish before making another change. Files may take time to become available on another device. If the switch is unavailable, check iCloud Drive access; if the section shows an upgrade notice, check your Pro subscription.
Ableton Link, Audio Unit, and Apple Watch
Ableton Link
Open Settings → Ableton Link to configure synchronization with other Link-enabled apps or devices. Enable Link in the apps you want to connect and allow local-network access if requested. Use the Link settings to review the connection before practicing together.
Audio Unit (AUv3) · Apple only
Metronomics includes an Audio Unit extension for compatible music hosts. Add Metronomics from the host’s Audio Unit instrument list, open its interface, and configure your rhythm. The host controls its audio routing. Use the main Metronomics app for settings that are not available inside the extension.
Apple Watch remote
Open Metronomics on both your iPhone and Apple Watch. The Watch app controls the metronome on the phone: it is a remote, so playback comes from the phone’s audio setup.
Use Start/Stop on the first page and turn the Digital Crown to change tempo. Swipe between pages for tempo, time signature, downbeat interval, bar repeats, and audible/inaudible bars. The time-signature adjustment buttons are available when the current meter can be adjusted directly. If the Watch does not respond, bring Metronomics to the foreground on the phone and check the connection.
Keyboard shortcuts
On Apple platforms, with a hardware keyboard, use these shortcuts when the metronome screen has focus. Text-entry fields use normal typing behavior.
| Key | Action |
|---|---|
| Space | Start or stop |
| − / + (or =) | Change tempo by 1 BPM |
| ↑ / ↓ | Change tempo by 5 BPM |
| T | Tap tempo |
| ⌘T | Open tempo entry |
| 1–9 | Set a time signature of 1/4 through 9/4 |
Basic and Pro
Basic includes the metronome mixer, probability, per-layer sequencing, custom subdivision ratios, mixed meters using standard denominators, practice controls, saved metronomes, playlists, metronome-file sharing, and usage history.
Pro is available on Apple platforms only; it is not available on Android. Pro adds Grid, Wheel, Inspector, custom sounds, MIDI subdivisions, iCloud sync, additional time-signature denominators, audio and MIDI export, and alternate app icons where supported.
On Apple platforms, open Settings → Upgrade to see the subscription offered in your app. If you already subscribed with the same Apple ID, use Restore purchases. With Pro active, open Settings → Subscription → Manage subscription to manage it. Check the purchase screen for current pricing and terms.
Troubleshooting and more help
- The metronome runs but I hear nothing.
- Check the device or host output volume and audio route. Check that at least one layer is unmuted, has volume above zero, and has nonzero probability or active sequence steps. Check whether you are in an inaudible bar. External MIDI requires a receiving instrument.
- I cannot find the advanced controls.
- Tap the three-line button beside the tempo panel to open the controls drawer, then scroll it.
- I cannot find Grid, Wheel, or Inspector.
- Grid, Wheel, and Inspector require Pro on Apple platforms and are not available on Android. On Apple platforms, check that Pro is active, then enable the corresponding Show tab switch in Settings.
- The click is uneven or has unexpected gaps.
- Check each layer’s probability, swing, offset, and sequence. Also check Audible/Inaudible Bars, Random audible bars, and Tempo Change.
- Inspector attacks do not line up.
- Recalibrate for your current audio setup. For MIDI input, check the MIDI latency setting. Adjust Peak factor if the wrong attacks are being detected.
- The screen in this manual looks different from my app.
- This manual covers the redesigned app on Android and Apple platforms. Screenshots show the Apple app, and layouts may differ on Android. For older interfaces, use the previous-version Apple manual or previous-version Android manual.
You can reopen the in-app introduction with Settings → Walkthrough. For further help, visit the Metronomics website.
If you have more questions or feedback, email info@metronomicsapp.com.